Vulnerability Management: Scanning and Remediation with Nessus Essential
Summary:
In this project, I used Nessus Essentials, a widely used vulnerability scanning tool, to run scans on a Windows 10 virtual machine pre-configured in VirtualBox. I intentionally added outdated software to simulate real-world security vulnerabilities. Using Nessus, I conducted thorough vulnerability scans to identify potential risks and then remediated selected vulnerabilities to better understand the process of mitigating threats. This hands-on project provided valuable experience in vulnerability management, allowing me to explore the steps of identifying, prioritizing, and remediating security issues.
Highlights:
🔧 Set up Nessus Essentials for vulnerability scanning on a Windows 10 virtual machine.
🖥️ Installed outdated software on the VM to create real-world vulnerabilities.
📊 Performed vulnerability scans using Nessus to identify security risks on the virtual machine.
🛠️ Remediated vulnerabilities to understand the process of fixing security flaws.
🌐 Verified network connectivity between the virtual machine and internal network to ensure proper communication for scanning.
🚀 Gained hands-on experience in vulnerability management and remediation.
Key Insights:
🛡️ Vulnerability Management: Setting up Nessus Essentials and scanning a machine with outdated software gives you direct experience in identifying and addressing security risks.
🕰️ Deprecated Software: Installing old software simulates real-world vulnerabilities that exist in many systems today, helping you learn how to manage risks in outdated environments.
🔍 Vulnerability Scanning: Running scans and analyzing results teaches how to prioritize and address high-risk vulnerabilities, a critical skill for cybersecurity professionals.
🔨 Remediation: Fixing vulnerabilities offers a practical understanding of how to secure systems after identifying potential threats.
🔗 Network Connectivity: Verifying the network setup ensures your scans can reach the target machine, a necessary component in vulnerability assessments.
Part 1: Setting Up Nessus Essentials and Initial VM Configuration
Before diving into this project, make sure that VirtualBox and your Windows 10 virtual machine are already installed. For step-by-step instructions on setting them up, check out my previous project Building a Virtual Home Lab with Active Directory.
First thing we are going to do is head over to the Tenable website to download Nessus Essentials. Head over to Nessus Essentials and fill out the registration form.

– Once completed, an activation key will be sent to your email along with a link to download Nessus.
– Be sure to download the version that matches your host OS.

From here you are going to double-click on the installer download to get started.
– First, accept the license terms and agreements.
– Continue to follow the prompts to finish the install.
– Once the install is complete you will be redirected to a “localhost” url.
-Select Connect via SSL.
– On the warning screen select Advanced and Proceed to Localhost
Once Nessus initializes we are going to select Nessus Essentials; follow the prompts to enter your activation code and continue with the setup.

Now we are going to open up VirtualBox and navigate to our Windows 10 virtual machine.
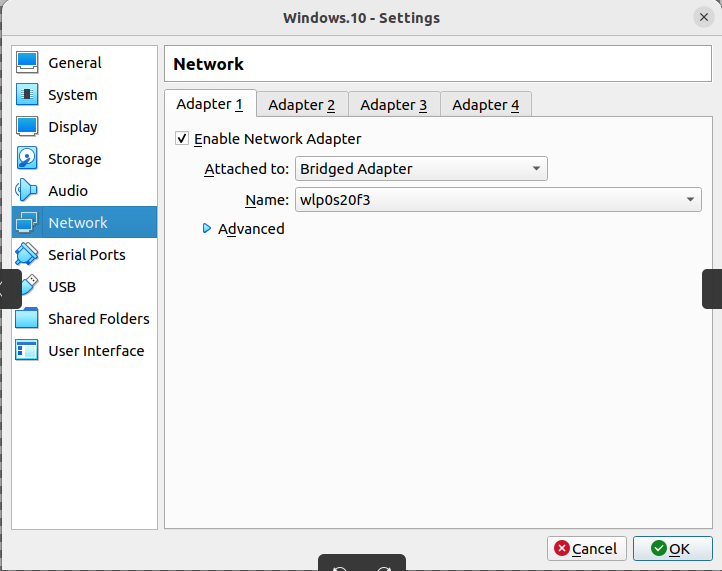
– Right click on our VM and select settings.
– Head over to Network and ensure that Adapter 1 is set to Bridged Adapter to enable proper network communication.
Next, let’s go ahead and launch our Windows 10 virtual machine.
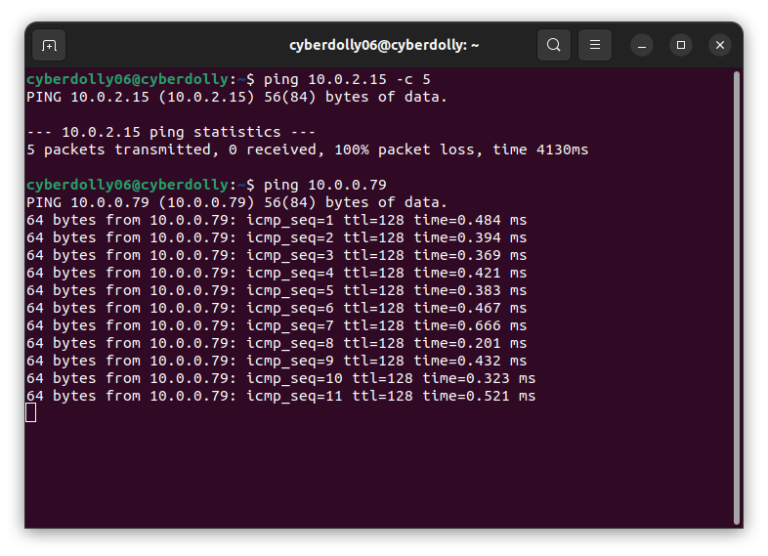
Once the Windows 10 virtual machine is up and running, let’s open the Command Prompt and run the ipconfig command to grab the IP address which we will need for our scans.
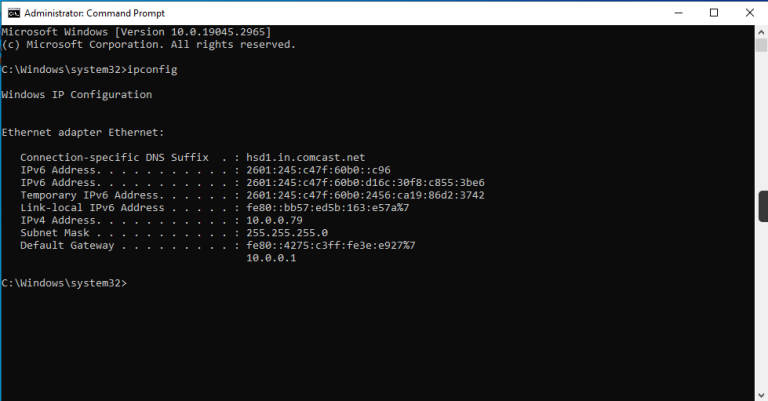
Now that we have our IP address we are going to ping it from our host device to test our connection.
– If your ping request times follow these steps:
– Go to Start and type in “wf.msc” to open your firewall settings.
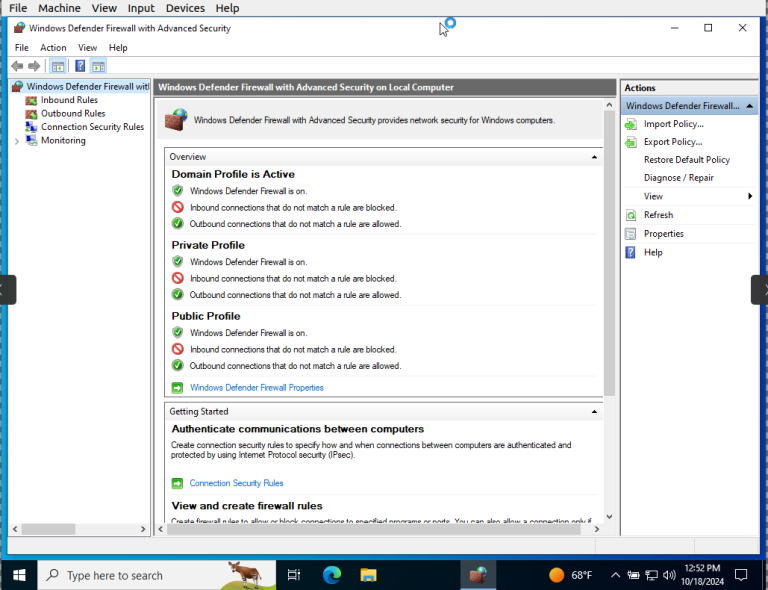
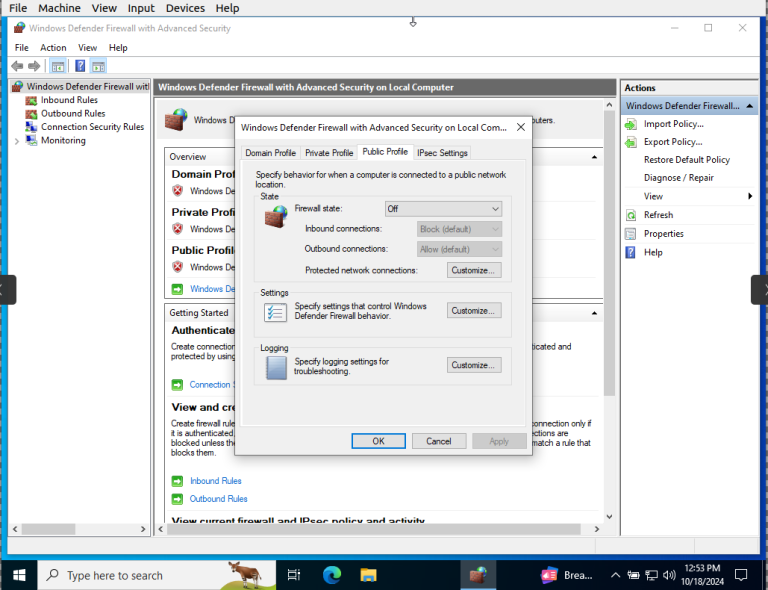
– Under the Overview section click Windows Defender Firewall Properties
– Use the tabs to go to the Domain, Private, and Public properties and change the Firewall State to “off”.
Now let’s go back to our command prompt on our host device and try pinging our VM again. We should see something like this:
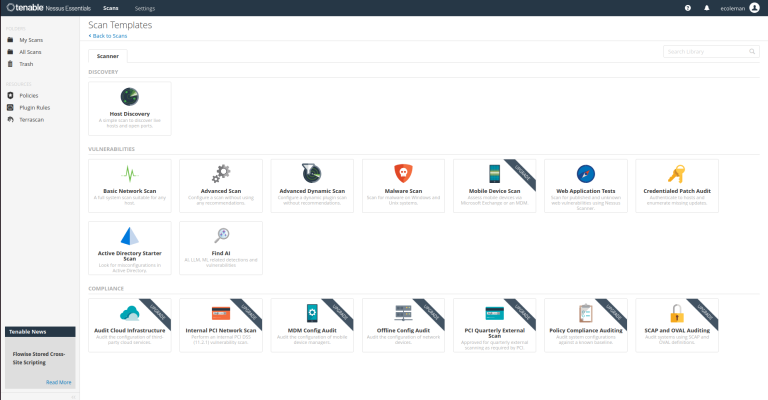
From here let’s head back to Nessus Essentials. We are going to run our first basic scan for vulnerabilities.
– Under Scans scroll down to click on Basic Network Scan.
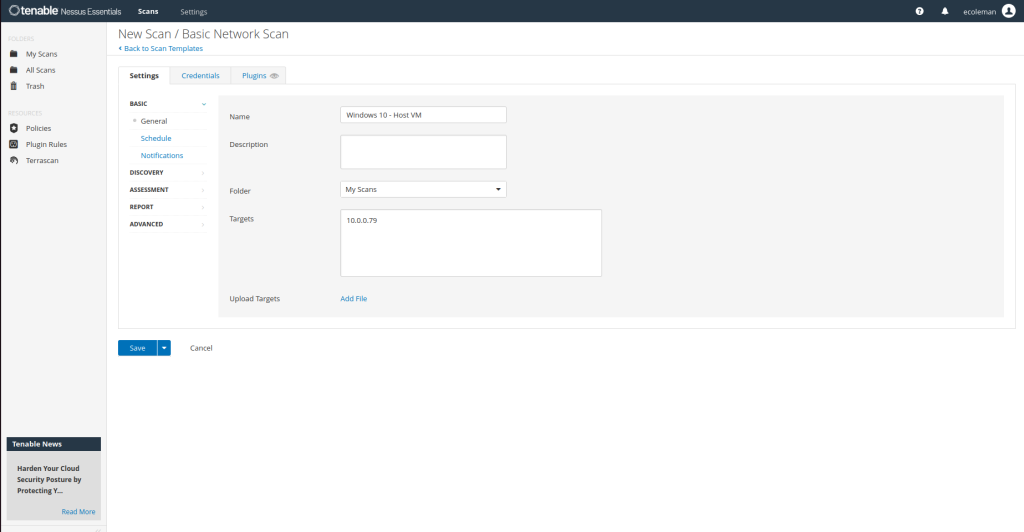
– Next you are going to name your scan. I just used “Windows 10 VM” for this lab.
Now are we are going to make some configurations before running our target scan.
– First, let’s name our scan for this lab I chose “Windows 10 – Host VM”.
– Enter the the IP address for your Windows 10 virtual machine as the Target.
– Next, click on the Credentials tab select Windows and type in the username and password to your virtual machine.
*This will allow for a more thorough scan.
– With everything configured click My Scans to go back to show our scan and hit the play button to launch.
As the scan progresses, we’ll keep an eye on the findings, which will highlight any vulnerabilities detected. This may take some time depending on the number of issues identified.
Once the scan completes, Nessus will automatically generate a detailed report. We’ll begin by navigating to the Scan Results section, where all discovered vulnerabilities will be listed.
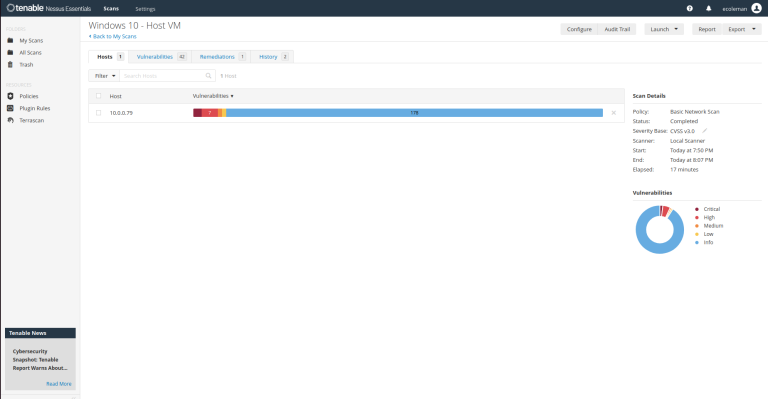
After reviewing the severity and details of each vulnerability, we can prioritize which ones to address first. Typically, we’ll want to focus on Critical and High vulnerabilities, as these pose the most significant threat.
– We are not going to dive too far into the remediation steps now as we will look into that a little further into the lab.
Our next step is to simulate a real world security risk. Here we are going to first download a deprecated version of Firefox onto our Windows 10 virtual machine. You can find that link here.
– Once downloaded, double click the installer and go through the steps to install the software on the virtual machine.
* If any warnings about the software’s outdated nature appear, go ahead and acknowledge them.
– Proceed with the default installation settings.
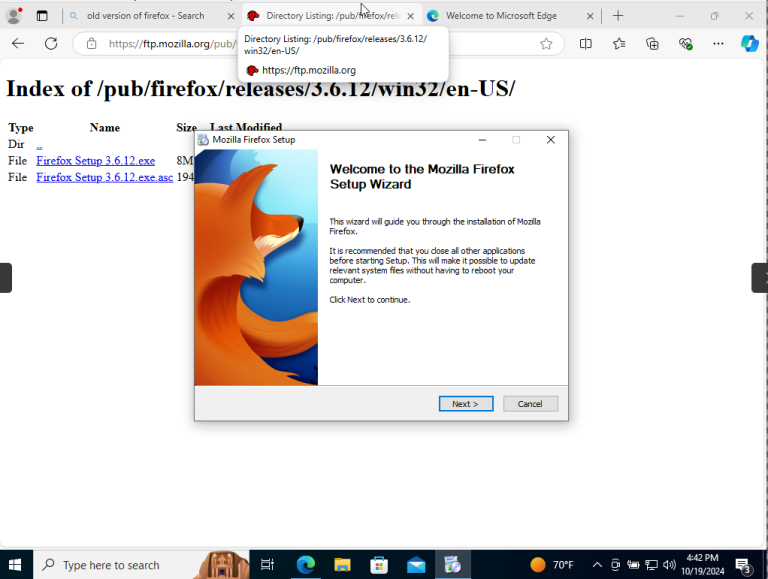
– After installation, ensure the software is properly set up and running on the virtual machine.
* This will let us know that the vulnerable application is active and ready for the scan.
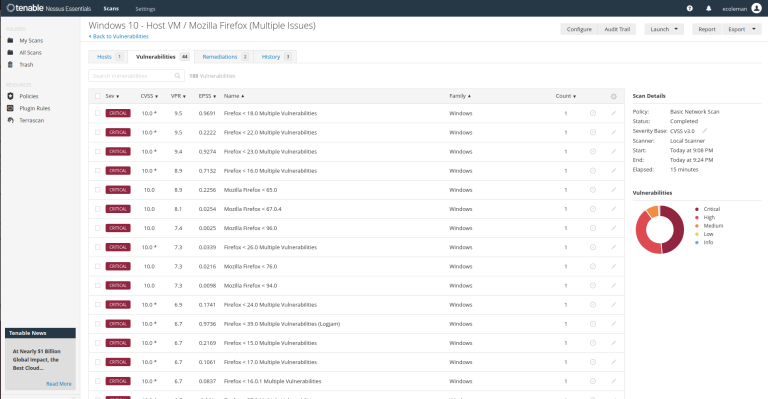
We can now go back to Nessus Essentials and launch a new vulnerability scan.
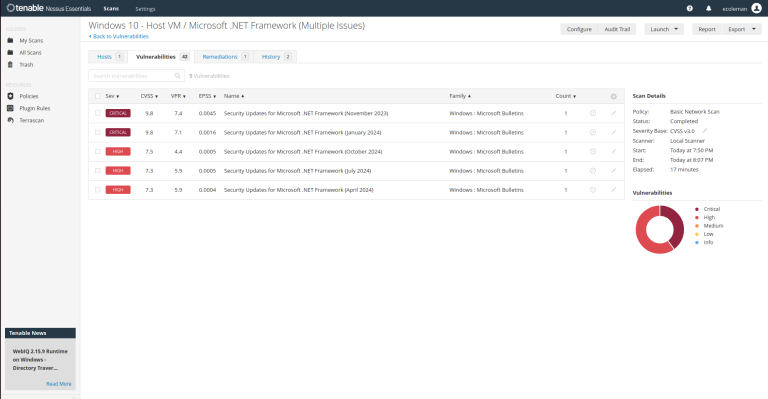
Once the scan is complete notice the vulnerability bar is split into four severity levels visually breaks down the proportions of vulnerabilities, giving a quick view of the security state.
The majority of the vulnerabilities detected are specifically tied to Mozilla Firefox on the Windows 10 host machine
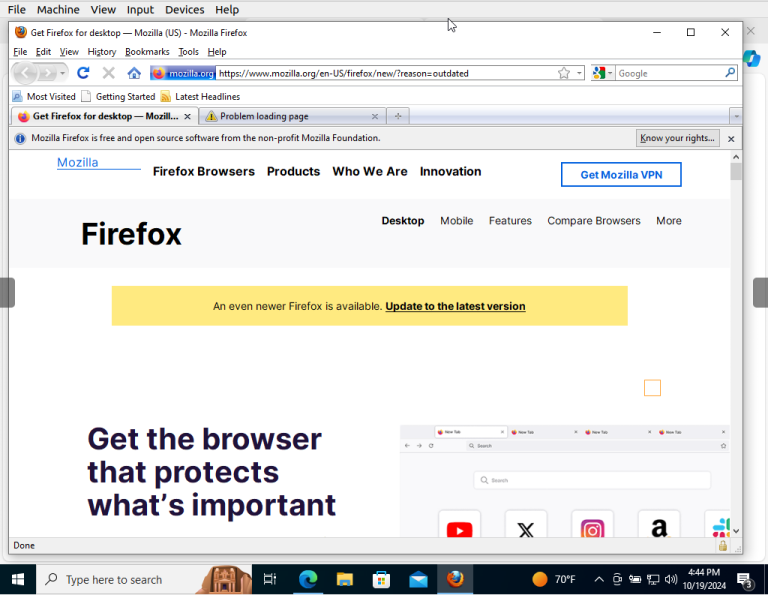
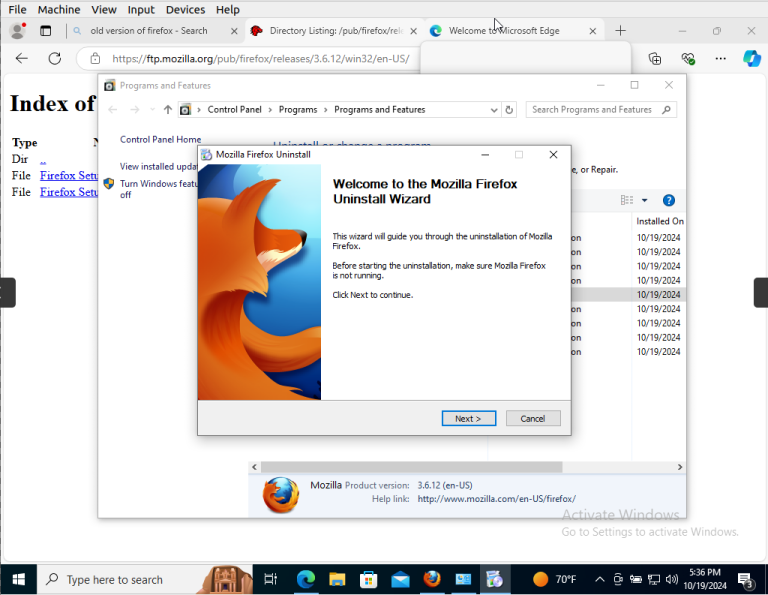
I am not going to go far into the remediation recommendations for this scan; we are just going to uninstall Firefox from our virtual machine.
Before completing our final scan after uninstalling Firefox we are going to try to remediate some of the critical and high vulnerabilities that were found.
– To uninstall Firefox navigate to Control Panel followed by Programs. Select Programs and Features.
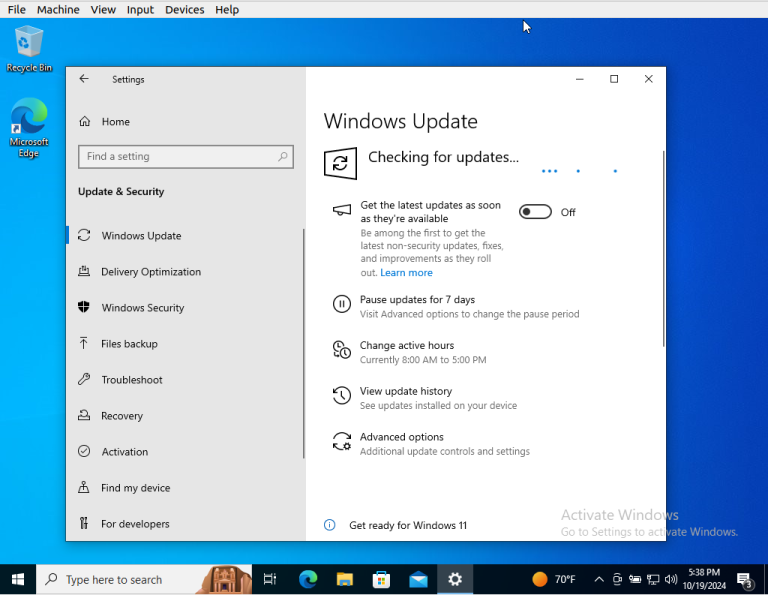
The first thing that we are going to do after uninstalling Firefox is to complete any system and software updates.
-Navigate to Settings and Security and Updates we are going to just Check for System Updates.
* Install any updates that populate.
– Next go to Microsoft Store and Downloads.
* Select Update All
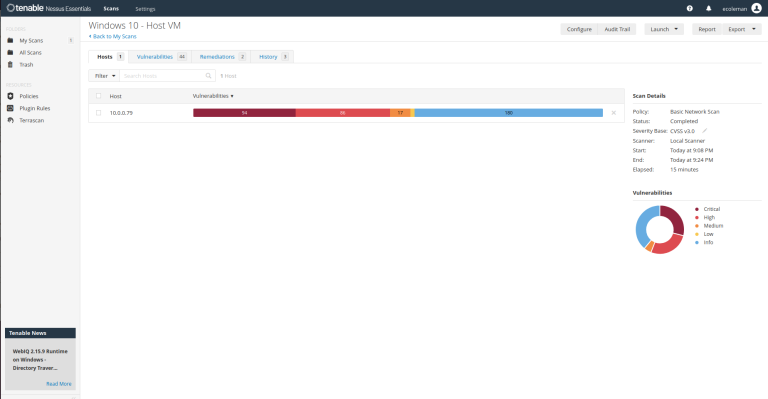
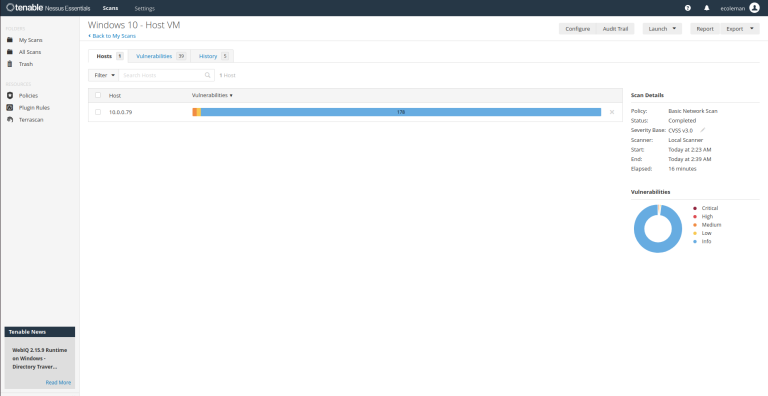
Now let’s head back to Nessus Essentials to complete our 3rd scan.
– I still got back a couple of Critical and High errors on this scan.

I am going to look further into this vulnerability and the remediation recommendations.
– After going into vulnerabilities there is a WinTrustVerify Validation that needs to be added.
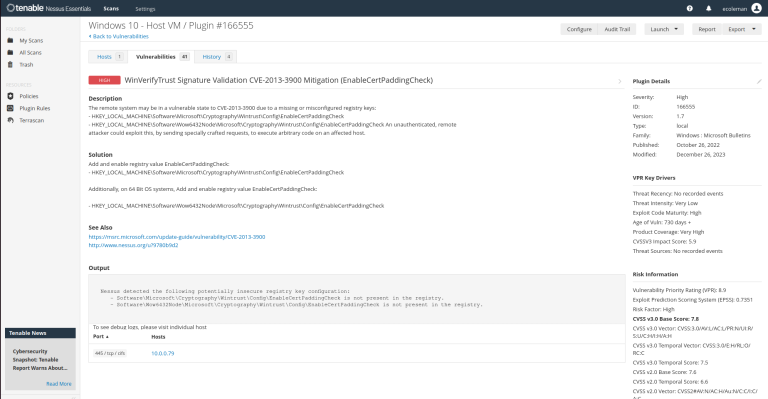
– After clicking on the remediation recommendations links I am taken to the Microsoft MSRC page for security updates.
– This is going to provide the steps to add the Registry Key.
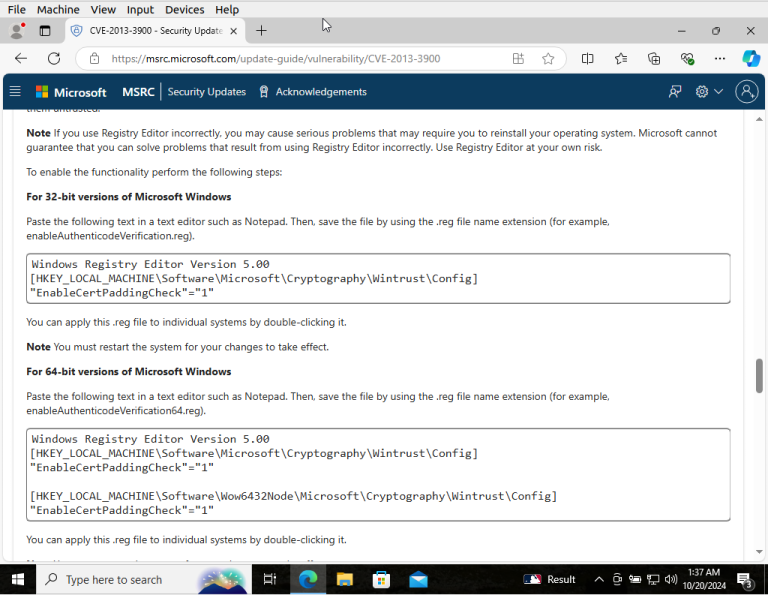
– According to the steps listed on the MSRC site lets create a Notepad file.
*I will call it Wintrust and save as a .REG file instead of a .TXT.

– Next open the Command Prompt and type in the following command:
* reg import C:\Users\"username"\Desktop\wintrust.reg
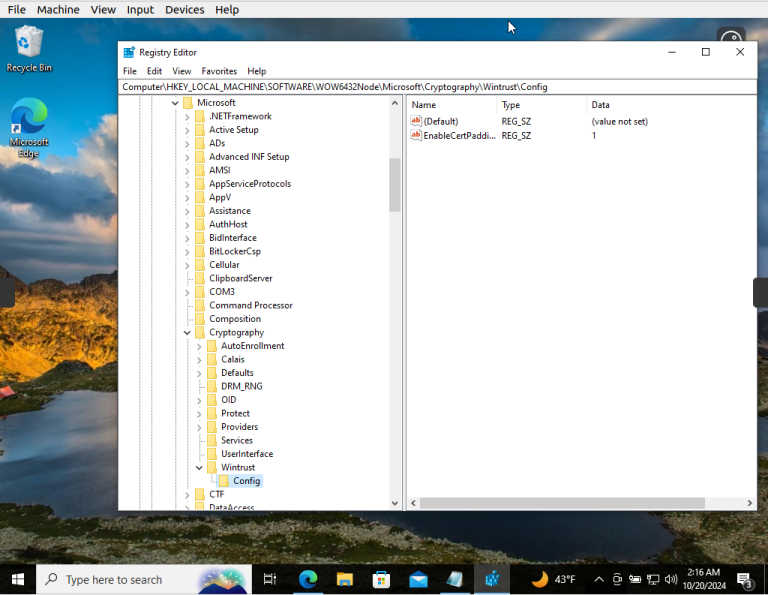
– Now let’s restart our virtual machine for those changes to take effect.
– Once our system reboots let’s verify our reg file has been added properly.
– Click Start and type in Registry Editor and Open as Administrator
– Navigate to the following path to ensure the file was added:
* HKEY_LOCAL_MACHINE\Software\Microsoft\Cryptography\Wintrust\Config
Let’s head back to Nessus Essentials to do one final scan for this lab to ensure we have remediated the Critical and High risk vulnerabilities.
Lastly, lets go back to our Firewall settings and turn each of the profiles back on.
We successfully remediated the critical and high-risk vulnerabilities identified in the scan, including outdated Firefox versions. After applying updates, follow-up scans confirmed the issues were resolved, significantly improving system security. This demonstrates the importance of staying vigilant with updates and proactive in managing vulnerabilities.